

Do you need to add a signature to a Pages document? Whether you’re sending a contract to a client or just want to sign your name at the bottom of a letter, adding a signature is easy. In this article, we’ll show you how to do it. We’ll also give you some tips on how to make sure your signature looks great every time.
How to Insert a Signature in Pages: Four Different Options
If you’re a Mac user, you can easily create a signature and insert it into a Pages document. There are a few different ways to do this, depending on what you have available. For example, you can:
- use e-sign software services
- insert an existing image of your signature in a document
- draw your signature in the app
- use Apple Preview for PDFs
We’ll show you how to do all of these things below.
E-Sign Software Services
In today’s fast-paced business world, efficiency is key. That’s why more and more companies are turning to e-sign software services. These services allow businesses to electronically collect and store signatures from their customers and employees. This can save a significant amount of time and hassle, as there’s no need to print, fax, or mail documents back and forth. In addition, e-signatures are legally binding in most countries, so there’s no need to worry about the validity of the agreement. With so many benefits, it’s no wonder that e-sign software services are becoming increasingly popular. If your business is looking for a way to streamline its operations, e-sign software may be the perfect solution.
If you have electronic signature software installed on your computer, you can use that to create a signature. Simply open the software and follow the prompts to create your signature. Once you’re done, you can export the signature as an image and insert it into your document.
You may use our guide to find the best e-sign software for you.
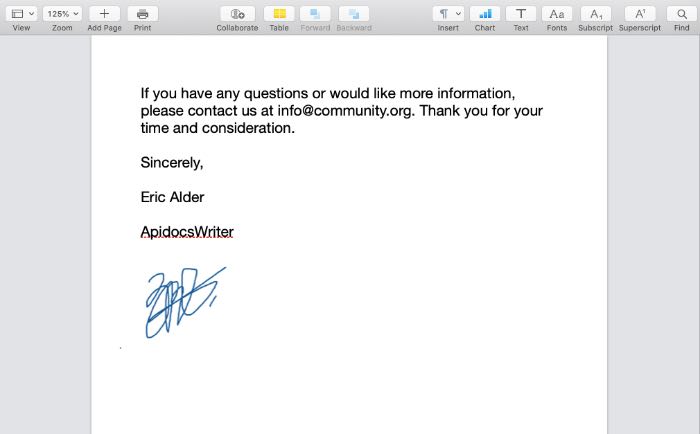
Insert an Existing Image of Your Signature in Pages
If you already have an image of your signature (for example, if you’ve scanned it or taken a picture of it), you can insert that into your document.
Follow these steps to sign your document in Pages:
- Open the document in Pages.
- To sign a document, move your cursor to the spot where you want to sign and type your name.
- Click on the Insert menu.
- Click on Choose.
- Locate the image of your signature on your computer and click Open.
- The image will be inserted into your document. You can then resize it and move it to wherever you want it to go.
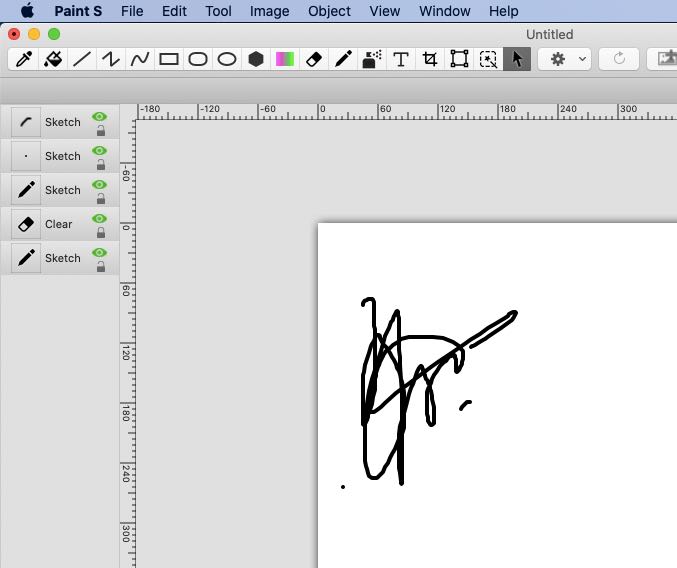
Draw Your Signature in Drawing Apps
You can also use a drawing app to create your signature. This is a good option if you don’t have a picture of your signature handy.
There are many different drawing apps that you can use, but the simplest way using Paintbrush, Patina, Sketch, or Paint S for this purpose.
Once you have the app open, follow these steps:
- Select the color and brush/pencil on the toolbar
- Start drawing your signature
- When you finish, save the picture in jpeg/png format (File -> Save as) and insert it into your Pages document.
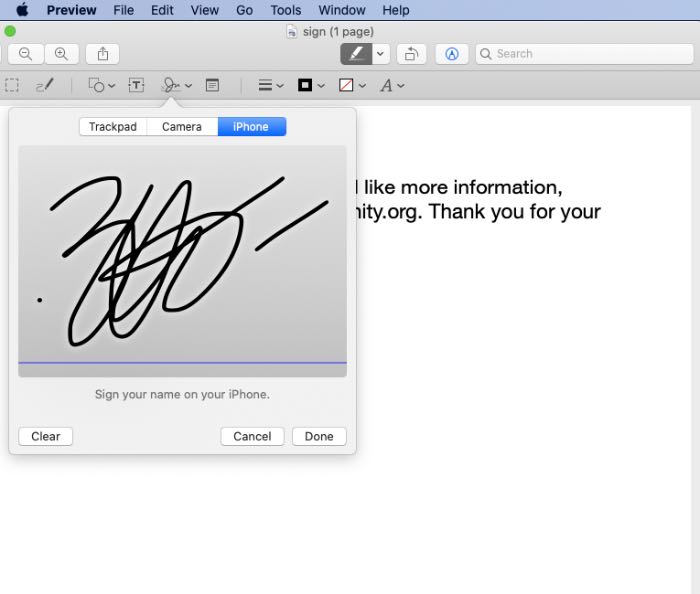
Use Apple Preview for PDFs
If you need to sign a PDF, you can use Apple’s built-in Preview app to do it. This is a good option if you’re signing a document that someone has sent to you electronically.
To sign a PDF in Preview:
- Open the PDF in Preview
- Click on the Markup icon (it looks like a pencil)
- Click on the Signature icon (it looks like a pencil and paper)
- A menu will pop up. Click Create Signature from Built-in iSight. If you don’t have an iSight camera, you can create a signature using your trackpad or iPhone.
- Sign your name using your mouse or trackpad when prompted rap up
- When you’re done, click Done
Your signature will now be inserted into the PDF. You can move it around and resize it as needed. To save the PDF with your signature, click File -> Export As and choose where you want to save it.

That’s it! You’ve now successfully added a signature to a PDF using Preview.
Pros and Cons of Inserting Signature in Pages/Preview
There are a few pros and cons to consider when deciding whether or not to sign your name in Pages or using Preview tools. On the plus side, drawing or inserting a scanned signature can be a quick and easy way to add a personal touch to documents. It can also be helpful if you need to sign a document electronically and don’t have a scanned copy of your signature on hand.
On the downside, drawing your signature in Pages can be time-consuming and it may not look professional. And it is also could not legally binding. If you need to create a valid signature, you should use an e-sign service.
Pros:
- Convenient and easy to use
- Can be used without an internet connection
- No need to worry about someone stealing your signature
Cons:
- The signature may not be as secure as an electronic or digital signature
- It may not be legally binding
- It may not be accepted by all organizations
FAQs About Adding a Signature in Pages
Can I add a signature in Pages on my iPhone?
Yes, you can add a signature in Pages on your iPhone by using the built-in camera or trackpad.
Can I add a scanned signature to a PDF in Pages?
Yes, you can add a scanned signature to a PDF in Pages.
Can I use my finger to sign a document in Pages?
No, you cannot use your finger to sign a document in Pages. You must use either your mouse or trackpad.
Do I need an iSight camera to create a signature in Preview?
No, you do not need an iSight camera to create a signature in Preview. You can create a signature using your trackpad or iPhone.
Can I add a signature in Pages on my iPad?
Yes, you can add a signature in Pages on your iPad by using the built-in camera or trackpad.
Is it possible to make a legally-binding signature in Pages?
No, a signature created in Pages is not legally binding. If you need to create a legally-binding signature, you must use an e-sign service for this purpose.
If you have any other questions about how to add a signature in Pages, feel free to leave them in the comments below! And be sure to check out our other articles on document creation and management tips and tricks. Thanks for reading!